Friday, July 20, 2012

Use What You Have Pasta Dinner

I LOVE a good challenge and tonight I got one!  I needed to use what we had in our pantry & this is what I came up with~
A yummy simple pasta dinner~
This is what I used:  I had bacon so I cut it up in small bite sized pieces & fried it up until it started turning brown then I added onion & garlic~
I had some mushrooms so in they went along with them I added fresh rosemary & sage~
Look at this GOODNESS~

Mix it all together add parmesan cheese or any other Italian cheese & you got yourself one heck of a GREAT DINER~ ENJOY!

Wednesday, July 18, 2012

Ballard Designs Inspired Mirror

When we moved into our current home we quickly realized we did not have enough linen storage upstairs, so off we ran to Ikea & purchased this shelving unit.  It fit the ticket & the bathroom where it was  going live, the only thing is I did not care for the "wood" look or the plastic door panel!  At the time I did not have anytime to make any changes as I was a new mommy to my twin angels, so it just sat there for a few years while I loved on my babies and worked up the courage to finally do something with this cabinet.  The problem, well I just did not know how I wanted to change it.  I knew I wanted to paint it, & I knew we had some low VOC paint that was left over from our cabinets so started with that.  Originally it was a blond birch veneer, I am so glad I painted it, I think it looked better but it needed more.  Now don't get me WRONG, I love Ikea, but from the start I knew I wanted to change it.
Then I had this hair-brained idea to try this, YUCK~what a major fail, so off came the aluminium and once again I was left with the plastic door panel~
One day as I was looking through one of my old Ballard Designs catalog I remembered seeing these and thought, might I be able to do this to the door panel? YES~Yes I can do it!
Garden District Mirrors
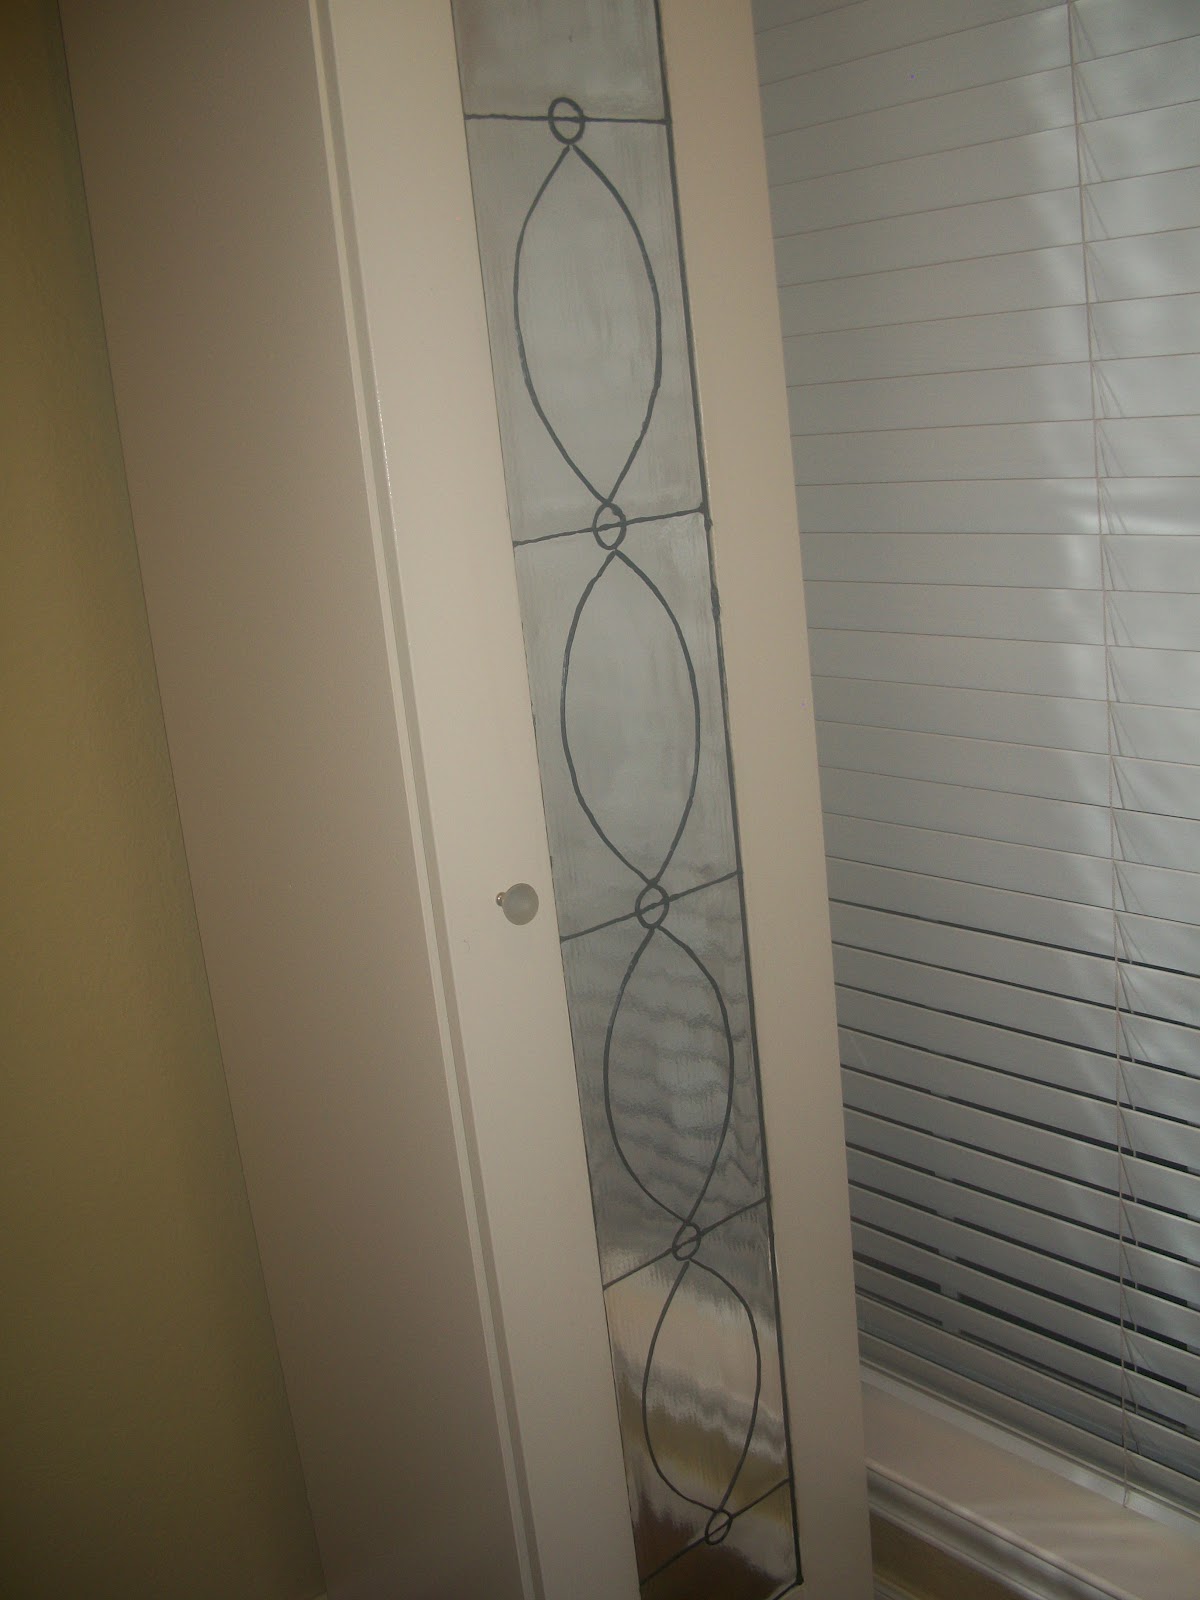
 This is what I came up with~ I wished I could have gotten a much better picture, I took tons but had few that looked good enough to post~
 This is what I used to accomplish this look:
*  Faux Mirror Scrap Paper
*  Faux Lead
*  Foam
*  Tacky Glue
*  Glass Knob
All bought at Hobby Lobby~
I first glued down the faux mirror, allowed it to dry overnight, then I made a template with the foam, measured out where I wanted to place the design & used a sharpie to trace it out, I used an old tack I had on hand for the small circles~
I am covering the design I traced out with the sharpie with the faux lead, boy this stuff was kind of hard to use as it would not give me an uninterrupted stream of lead so I needed to go over the design several times to get a consistent look~
Here it is all in all it's glory, drying!  I added a new door knob I also changed out the feet (sorry not pictured)~
Well what do you think?  I am pretty happy with it~
Thank you, for checking out my blog, I hope you stop by often, I also hope you will leave me some comments, I love comments & try to answer all of them~
Thank You & Many Blessings~

Share Your CreationsPhotobucket

One Artsy Mama

Monday, July 16, 2012

I'm Backkkk!

Hi my friends welcome back! I am thrilled to be back and I am sorry that it took me awhile to come back, but I sure hope that you are happy with the end result! Well as you can see I gave my blog a facelift and as I said before I studied some of my favorite blogs so I pray I have made some nice improvements that you will enjoy, and you come back to visit and leave me love often.
This is what I have to share with you today!   I designed this beautiful crest for my husband and my angels. Every symbol has a story and I wish to share those stories with you~ This is the best picture I was able to take of our "new" family crest" as it is hanging now in our entry way.  In the back ground is a big brown T monogram  for our last name~
The knight head is from my husbands original family crest I love the cross on the helmet it is a sign of protection,  the red and yellow decorative swirls were also part of the original crest ~
The rampant lions are from my mother in laws crest and they are also the symbol for my angels, I added the crowns on each lion. Since the angels were in the womb I have always called them Prince A and Prince B, so adding the crowns were the perfect touch~


 I was not able to get a very good shot of the lion on the left, but it is just as detailed as the one on the right. The crown was painted red~

The swan is from my mom's family crest and it is the true symbol of her maiden name, the back fluer's are also from my mom's crest.  I LOVE swans they are so regal & elegant~
The red waves are from my father's family crest (my maiden name) and I think it is so fitting that the swan is swimming on these waves.  These waves are also the true symbol of my maiden name~
We hung the "new crest" in our entry one some curtain rods I bought for $9.99 and I sewed leather tabs to hang it from.  I wanted the crest to have a old world/antique look therefore the brownish look in the background~
  Handmade 52

Share Your CreationsPhotobucketThe DIY DreamerOne Artsy Mama

 
Site Design by Designer Blogs