The day we found out I was pregnant with my angels we were thrilled and we started calling them Prince A~Prince B & Princess C! To us they were the most important people in the world and the greatest & most wonderful Gifts from GOD! They were ROYALTY! If you have been following me you will know that I have a huge collection of crowns all for the angels~
Since I decorated their bedrooms in a "royal" theme I thought it would be great to have different headboards other than the crib headboards we had, but I did not want to spend a lot of money since I tend to change decor often. My husband is in the real estate development business & when I would go to his office I noticed he had tons of foam core that he uses for projects that is when it hit me! Foam core is easy to cut, so light weight & should it fall, heaven forbid it would not hurt either of my angels. I made these just a few months before I knew what a blog was.
Here is the process I used to make them~
First I started by cutting the foam core I used a huge clock (now a chalk board) I have to make the circular part I then covered it with an Ikea duvet insert~
I hot glued the insert and the fabric. Oh by the way I actually used drapery blackout fabric, like all fabric it has two sides ha-ha one side feels like fabric and the other side looks & feels like plastic it kind of has a sheen to it. I used the side that has a bit of sheen on the outside. I used this side because I knew it wold be easy to wipe off should it get stained~
This is what it looks like when I finished doing the first glue down. I needed to do some fine tuning to make it taut~
I could not wait to see what it would look like in the angels bedroom. I bought the beautiful crown at Hobby Lobby~
As you can see I was not able to get it completely smooth, but I knew that the next step would pull it to look smooth~
Guess what I used? Come on guess~
If you guessed brads then you are so correct! Yea, for you. I bought these at a great price as I was needing tons I hit the jackpot. I knew I could not leave them as is so this is what I did~
I gave each & everyone of these brads a key so that I could paint them with oil rubbed bronze spray paint. I stuck them into a pool noodle that I cut and painted them~
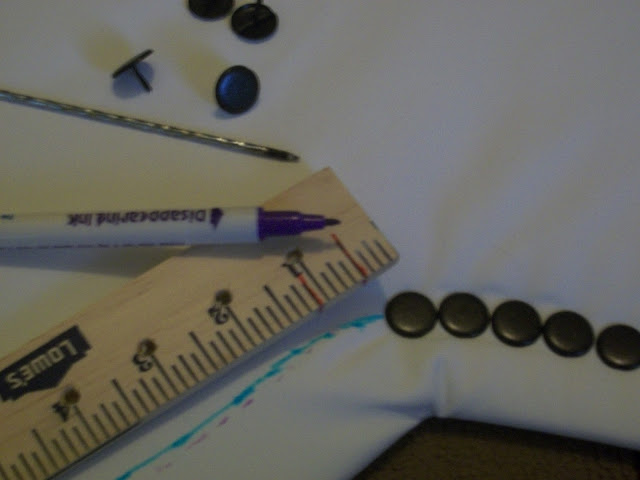
I measured 4 inches down from the top & drew a line with a sewing pen (so I can erase it once I was done (with water)) I then measured a brad for spacing purposes (see the red lines) & placed the brads accordingly~ Don't they look perfect?
I thought I should take a picture to show you what it looks like once it is all done. I hot glued all of the brads so that the angels would not be able to remove them & to attach the crown I used some fishing line & glue, you can see from this picture I need to re inforce the crown with probable some buttons to keep the angels from pulling it off as this one is!!
This is the first one I made. Notice that the demilune is larger in one of them~
I took this picture because it was stained & I wanted to show you before & after pictures of how easy it s to wipe off the stain with a little peroxide & rag~
All clean~
Close Up Shot~
*****
GRAB A NICE DRINK SIT BACK & BROWSE ~Atir Inspired Decor ~AID~ IF YOU HAVE ANY COMMENTS I WOULD LOVE TO HEAR THEM SO PLEASE BE KIND & LEAVE ONE OR MORE IF YOU LIKE~ I WOULD ALSO BE HONORED IF YOU BECAME A FOLLOWER OF ~Atir Inspired Decor~AID~







Close Up Shot~
*****
Thank you for stopping by Atir Inspired Decor~AID
GRAB A NICE DRINK SIT BACK & BROWSE ~Atir Inspired Decor ~AID~ IF YOU HAVE ANY COMMENTS I WOULD LOVE TO HEAR THEM SO PLEASE BE KIND & LEAVE ONE OR MORE IF YOU LIKE~ I WOULD ALSO BE HONORED IF YOU BECAME A FOLLOWER OF ~Atir Inspired Decor~AID~




Hi, I’m Anne from Life on the Funny Farm (http://annesfunnyfarm.blogspot.com), and I’m visiting from Fantabulous Friday.
ReplyDeleteThese look fabulous! I love how creative you were in terms of your approach with finding materials. Job well done!
Anyway, thanks for posting this. If you’ve never visited yet, I hope you can pop by my blog sometime to say hi…
Hi Anne, I thank you so much for your nice comment. I am on my way to visit your blog NOW to say hi...Have a great week~
DeleteNina, great job on your headboard....it turned out so very nice! Thanks for stopping by with your kind words on my V.Day terrarium post.
ReplyDeleteJP~Thank you for your comment, I appreciate it so much~ Have a great week.
DeleteNina
PS if you turn off your word verification, in your setting, your comment will increase. I almost didn't bother to comment, I HATE deceiferring those words! Many people hit "publish" thinking that their comment has been sent because the window disappears and then the word verification windows opens below...:(
ReplyDeleteOh My Gosh, all this time I thought it was off! Thank you, so much for taking the time to inform me that it was on! Now maybe I 'will' receive comments~
DeleteBlessings~
Nina
Great job! Thank you for sharing this at Rustic Restorations Weekend!
ReplyDeleteTammy~Thank you, for stopping by my blog and leaving your comment. Have a great week!
DeleteNina
Wow! That looks so nice and quite easy to do too :-)
ReplyDeleteFollowing you back from http://adventuresofayorkshiremummy.blogspot.co.uk/
Thanks for following me :-)
What a wonderful job you have done on these! Good job Nina! Cheers.
ReplyDeleteFound you on lets get social... newest follower.
ReplyDeleteVisiting you back from Brown Sugar Toast! First of all, congrats on your angels!!! And second, I LOVE how you spray painted the brads so they look like nailhead trim! Brilliant!
ReplyDeleteWhat a fantastic idea!! :) It looks beautiful. Megan
ReplyDeleteYour headboard is just gorgeous! Have a great week...hugs, Penny
ReplyDeleteYou did a wonderful job on the headboard! I love the little crown. I'm really into crowns and angel wings right now. Thanks for linking up at Transformed Tuesday! Your picture is not showing up though and I think you need to link up again. I will leave that link up until I see you have re-listed. I want you to get all the traffic you can and having a pic helps. I'm a new follower and so glad to have you as a blogger friend. Hugs, Peggy~ PJH Designs
ReplyDeleteWow, you did a fantastic job on the headboard! Your newest follower from Transformation Tuesdays! I have a party going on right now that I would love for you to share your gorgeous headboard! :)
ReplyDeleteKathy @ lifeonlakeshoredrive.com
Wow you did an amazing job, love this idea I need a new one. Thanks for sharing with us at Creative Mondays :)
ReplyDeleteNew follower by GFC :)
DeleteLove everything about this! Great job. Found you on Today's Creative Blog.
ReplyDeleteVisiting from It's Always Ruetten {http://itsalwaysruetten.blogspot.com}
JQ
I had always wanted to try to do a headboard. Amazing job! Thanks for linking up at Dearcreatives.com
ReplyDeleteVery inspiring - gave me lots of ideas! Thanks for sharing it on Fluster's Muster Party.
ReplyDeleteHugs & Smiles
Robin
http://www.flusterbuster.com
I just love your headboard! Thank you so much for sharing at A Bouquet of Talent this week. I am so thrilled to have you share. :)
ReplyDeleteWell done! Very cute.
ReplyDeleteWOW!! Loving the royal headboard!! AMAZING!!
ReplyDeleteThanks so much for sharing this at The DIY Dreamer... From Dream To Reality!
Turned out great!!! I would love it if you would come share it at my Funday Sunday link party that opens this Saturday at www.the-crafty-cowgirl.com. Hope to see you there!
ReplyDeleteGreat job! Love your resourcefulness in finding the materials! (And thanks for no word verification as noted in one of the comments above! :-) ) Thanks so much for sharing on Busy Monday!
ReplyDeleteHi there everybody, here every one is sharing
ReplyDeletethese kinds of know-how, so it's fastidious to read this website, and I used to pay a visit this website everyday.
Feel free to surf to my webpage ... vintage clothing in nashville tennessee
Wow, marvelous weblog structure! How long have you been running a blog for?
ReplyDeleteyou made running a blog look easy. The entire look of your website is magnificent,
let alone the content!
Here is my weblog; http://www.greyscustomgold.com/no-fuss-secrets-for-modcloth-coupon-code-the-inside-track/
Good post. I learn something totally new and challenging on sites I stumbleupon everyday.
ReplyDeleteIt's always interesting to read through content from other writers and use a little something from their websites.
Feel free to surf to my site vintage Clothing In nashville tennessee
Hi there! Do you usse Twitter? I'd like to follow you if tnat would be ok.
ReplyDeleteI'm absolutely enjoying your blog and look forward to new posts.
Also vksit my web site :: nhs repeat prescriptions